Best Practices for Cutting, Shaping, and Applying Concrete Impregnated Fabric On-Site
Concrete impregnated material has revolutionized on-site construction, providing a lightweight, bendy choice to standard concrete for purposes like ditch lining, slope protection, and small-scale structures. Unlike inflexible concrete forms, this fabric combines the energy of concrete with the maneuverability of fabric, making it perfect for complicated shapes and hard-to-reach areas. However, to release its full potential—whether used as a Ditch Lining Material or for customized structures—following fantastic practices for cutting, shaping, and utility is essential. This information breaks down the integral steps to make sure your concrete impregnated material task is durable, cost-effective, and meets graph specifications.

Understanding Concrete Impregnated Fabric: Key Properties for On-Site Success
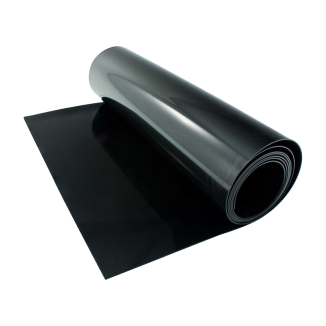
Concrete impregnated cloth consists of a woven or nonwoven geotextile base saturated with a dry concrete combine (typically Portland cement, aggregates, and additives). It stays bendy till activated with water, after which it treatment options into a hard, inflexible structure. This unique makes it light-weight for transport (up to 80% lighter than moist concrete) and handy to manage on-site. When used as a Ditch Lining Material, it gives amazing erosion resistance, chemical stability, and speedy curing times—reducing task downtime. To leverage these benefits, it’s imperative to work with the material’s properties: reduce it earlier than activation, form it whilst moist, and make sure suited curing post-application.
Pre-Application Preparation: Setting the Stage for Quality
Successful concrete impregnated cloth set up starts offevolved earlier than reducing the first piece. Proper practise minimizes blunders and ensures the fabric adheres to the web page and graph requirements:
1. Site Assessment and Surface Preparation
Evaluate the set up place to verify dimensions, slope gradients (for ditch lining), and floor conditions. For Ditch Lining Material applications, clear the ditch of debris, rocks, and vegetation—any unevenness can create strain factors that crack the cured fabric. Level the floor and compact the soil to stop settlement. If the floor is porous (e.g., sandy soil), observe a geotextile underlay to stop water from seeping out for the duration of curing, which can weaken the fabric.
2. Material Handling and Storage
Store concrete impregnated cloth in a dry, shaded region to keep away from untimely activation by using moisture (rain, dew). Keep rolls accelerated on pallets to forestall floor moisture absorption. Handle the fabric gently to keep away from tearing the geotextile base—even small rips can increase at some point of curing. Before use, test the expiration date (most merchandise have a 6–12 month shelf life) and investigate for signs and symptoms of harm or moisture publicity (e.g., clumping of the concrete mix).

3. Tools and Safety Equipment
Gather the imperative tools: sharp utility knives or material shears (for cutting), measuring tape, chalk strains (for marking), sprayers or hoses (for water activation), and gloves/eye safety (concrete combine can irritate pores and skin and eyes). For shaping, have stakes, ropes, or transient frames on hand to maintain the material in location whilst it cures. Avoid the usage of stupid tools—they can fray the geotextile, main to uneven edges and vulnerable spots.
Best Practices for Cutting Concrete Impregnated Fabric
Cutting is a essential step—imprecise cuts lead to ill-fitting pieces, gaps, or wasted material. Always reduce concrete impregnated fabricbefore activating it with water:
1. Measuring and Marking
Measure the set up region twice to verify dimensions, including a 5–10 cm overlap for seams (critical for Ditch Lining Material to stop leaks). Mark the cloth with a chalk line or water-soluble marker—avoid everlasting ink, which can bleed into the concrete and have an effect on curing. For curved shapes (e.g., ditch corners), hint templates onto the material to make sure accuracy.
2. Cutting Techniques
Use a sharp utility knife with a new blade or heavy-duty cloth shears. Cut alongside straight strains in one clean motion to keep away from fraying. For curves, make small, incremental cuts to hold the shape. Never fold the material whilst cutting—this can create uneven layers that therapy improperly. After cutting, investigate edges for fraying; trim any unfastened threads to make sure a easy bond at seams.

Shaping Concrete Impregnated Fabric: Molding While Moist
Once cut, spark off the concrete impregnated cloth with water and structure it immediately—this is when it’s most flexible. The window for shaping is confined (typically 15–30 minutes, relying on temperature), so work efficiently:
1. Water Activation
Spray or mist the cloth evenly with easy water—avoid soaking it, as extra water dilutes the concrete mix and weakens the ultimate structure. For massive pieces, prompt one part at a time to stop it from curing earlier than shaping. The material is prepared when it’s uniformly damp and bendy however now not dripping.
2. Shaping and Securing
For Ditch Lining Material, lay the activated cloth in the ditch, urgent it firmly towards the aspects and backside to conform to the shape. Use stakes or weights alongside the edges to preserve it in place—ensure there are no wrinkles, as these will harden into vulnerable spots. For customized shapes (e.g., small keeping walls), drape the material over brief frames or use ropes to pull it into the preferred form. Secure seams with the aid of overlapping portions 5–10 cm and urgent them collectively firmly; use water-proof tape for more reinforcement if needed.

Post-Application Curing: Ensuring Strength and Durability
Curing is the place concrete impregnated material develops its strength. Improper curing leads to cracking, decreased durability, and failure to meet graph standards:
1. Curing Conditions
Keep the cloth moist throughout the first 24–48 hours of curing—this approves the concrete to hydrate fully. In hot, dry weather, mist the floor periodically or cowl it with a damp geotextile to stop fast drying. In bloodless weather, shield the material from freezing (use insulated blankets) as freezing water disrupts the curing process. Avoid foot visitors or hundreds on the cloth till it’s entirely cured (typically 7 days for mild loads, 28 days for full strength).
2. Inspection and Touch-Ups
After curing, investigate the set up for cracks, gaps, or free seams. Small cracks can be repaired with a patch of activated concrete impregnated cloth reduce to size. For Ditch Lining Material, take a look at for leaks by using filling the ditch with water and checking for seepage—address any troubles at once to stop erosion.

Conclusion: Mastering Concrete Impregnated Fabric for On-Site Success
Concrete impregnated material affords unmatched flexibility and effectivity for on-site construction, from Ditch Lining Material to customized structures. By following high-quality practices for preparation, cutting, shaping, and curing, you make sure the cloth provides on its promise of strength, durability, and cost-effectiveness.
Whether you’re a contractor, landscaper, or DIY enthusiast, the key is to recognize the material’s properties: reduce dry, form wet, and treatment properly. With the proper equipment and techniques, concrete impregnated material eliminates the problem of normal concrete whilst turning in ideal results. For your subsequent project—whether lining a ditch, constructing a small maintaining wall, or growing a customized form—trust these exceptional practices to gain a professional, long-lasting outcome.
Contact Us
Company Name: Shandong Chuangwei New Materials Co., LTD
Contact Person :Jaden Sylvan
Contact Number :+86 19305485668
WhatsApp:+86 19305485668
Enterprise Email: cggeosynthetics@gmail.com
Enterprise Address: Entrepreneurship Park, Dayue District, Tai 'an City,
Shandong Province