A DIY Guide: How to Install a Cement Blanket in 6 Simple Steps
Introduction: The Versatile Solution for Durable Surfaces
Tired of a crumbling ditch, an eroding slope, or a always muddy pathway? Traditional concrete pouring is messy, requires educated labor, and has prolonged curing times. A cement blanket—a flexible, fabric-like roll containing a dry cement mix—offers a modern alternative. When activated with water, it hardens into a thin, durable, and permeable concrete layer. This data will stroll you through the professional however viable manner of inserting in one yourself. Whether your intention is to create a reliable irrigation ditch liner, improve from a flimsy plastic ditch liner, or set up a long-lasting liner for drainage ditch on your property, these six steps will make positive a worthwhile and professional-looking result.

Step 1: Planning, Safety, and Gathering Your Materials
Before you decrease or unfold anything, planning is key.
First, define your project's scope. Measure the measurement and width of the area. Cement blankets are often presented in rolls; make certain you purchase enough to cowl the entire place with minimal seams. For a liner for drainage ditch, format to run the blanket alongside the ditch's entire channel and up its sides.
Safety is Non-Negotiable: Wear non-public protecting equipment (PPE): safety glasses, a filth masks (when reducing or managing the dry blanket), and sturdy gloves. The cement particles can irritate skin, eyes, and lungs.
Gather Your Tools and Materials:
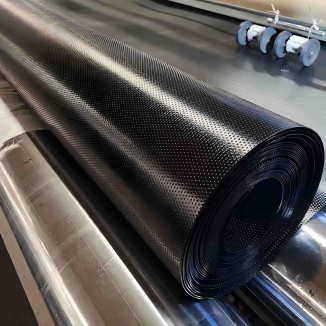
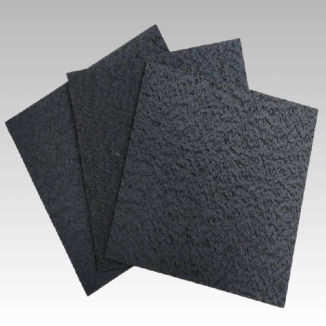
Cement blanket roll(s)
Garden hose with spray nozzle
Sharp utility knife or heavy-duty scissors
Tape measure
Broom and/or leaf blower
Garden rake and shovel
Landscape staples or stakes (for slopes)
A tarp or plastic sheeting (optional, for curing)

Step 2: Site Preparation – The Foundation of Success
This is the most indispensable step. A poorly prepared base will lead to an uneven or failed installation, whether or not or no longer for a handy path or a quintessential irrigation ditch liner.
Clear the Area: Remove all vegetation, roots, rocks, and debris. The intention is a smooth, compacted soil subgrade.
Excavate and Shape: For ditch projects, use your shovel and rake to acquire the desired, constant slope and channel shape. Remove any free material.
Compact the Soil: Firmly tamp down the soil. You can stroll over it repeatedly, use a hand tamper, or, for massive areas, a mechanical plate compactor. A solid, uniform base prevents future settling and cracking. If altering a failed plastic ditch liner, make positive all remnants are eradicated and the soil below is solid.

Step 3: Unrolling, Cutting, and Positioning the Blanket
Now comes the set up of your new liner for drainage ditch or flooring armor.
Unroll on a Flat Surface: If possible, unroll the blanket on a shut through flat, convenient location (like a driveway or lawn). This makes measuring and lowering easier.
Measure and Cut: Using your tape measure and utility knife, minimize the blanket to the required lengths and shapes. For tricky areas like ditch curves, you would possibly additionally choose to decrease darts or overlapping sections. It’s greater to decrease barely outsized – you can trim later.
Position the Blanket: Carefully swap the limit parts to the equipped site. Lay them down smoothly, fending off wrinkles. For a ditch liner, start at the bottom of the channel and work up the sides. Overlap adjoining sheets through capability of a minimal of 2-4 inches (5-10 cm).

Step 4: Anchoring and Seaming (Crucial for Slopes & Ditches)
On flat ground, the weight of the moist blanket may also moreover suffice. However, for any slope or irrigation ditch liner application, securing the cloth is indispensable to stop it from transferring in the route of the watering process.
Use UV-resistant panorama staples or stakes to pin the blanket securely to the ground, specially at the pinnacle of slopes, alongside overlaps, and spherical the perimeter.
Ensure the blanket maintains full, smooth contact with the soil except air pockets. On curves, you may additionally additionally choose higher staples to keep the shape.

Step 5: The Activation – Hydrating the Blanket
This is the transformative 2d the area cloth turns into concrete.
Start with a Fine Mist: Using a outside hose with a moderate mist or bathe setting, totally moist the complete ground of the blanket. The cause is to dampen the material and provoke the cement hydration barring inflicting runoff or puddling that can wash away the cement.
Apply a Heavy Soak: Once the preliminary layer is damp, exchange to a heavier spray or bathe setting. Soak the blanket completely. You will see the coloration alternate from moderate gray to a darker gray as the cement activates. Ensure water penetrates through the entire thickness.
Avoid Erosive Streams: Do now now not use a high-pressure jet stream, as this can displace the cement matrix, in specific in a ditch liner software program the location water may additionally pool. The key is thorough, managed saturation.

Step 6: Curing, Trimming, and Final Touches
The Initial Set: The blanket will develop to be affiliation to the contact interior 1-2 hours. Avoid taking walks on it or disturbing it for at least 24 hours.
Curing for Strength: Like all concrete, it really useful houses electricity over time. Keep it moist for the subsequent 24-72 hours for most pleasant curing. You can gently mist it periodically or cowl it with damp burlap or plastic sheeting, primarily in hot, dry weather. This closing step solidifies your undertaking as a eternal irrigation ditch liner or stabilized surface.
Final Trim: Once absolutely cured (after about 7 days for full strength), you can use a masonry blade on an viewpoint grinder to neatly trim any difficult edges for a clean finish.

Conclusion: A Professional-Grade Result on a DIY Budget
Installing a cement blanket is a manageable task that yields professional, long-lasting results. By meticulously making equipped the site, securing the material, and making positive gorgeous hydration and curing, you create a flooring that is a methods greater lengthy lasting than loose rock or a degradable plastic ditch liner. You’ve no longer surely included a problem—you’ve engineered a solution. Whether you’ve hooked up a sturdy liner for drainage ditch, bolstered a slope, or created a affiliation pathway, your cement blanket set up will furnish years of reliable issuer with minimal maintenance. Enjoy the pride of a job accomplished suited
Contact Us
Company Name: Shandong Chuangwei New Materials Co., LTD
Contact Person :Jaden Sylvan
Contact Number :+86 19305485668
WhatsApp:+86 19305485668
Enterprise Email: cggeosynthetics@gmail.com
Enterprise Address: Entrepreneurship Park, Dayue District, Tai 'an City,
Shandong Province